There are four base models in the Dutton-Lainson Company’s StrongArm Series of electric winches.
The two smaller models are the SA5000 and SA7000. The only difference between them is that SA5000s come with a 20 foot cable for standard single line pulls or lifts, while SA7000s have 50 feet of cable and an inline pulley block and hook that allows for double line pulls or lifts. Other than the longer cable and the pulley block, the two models are identical.
There are also two larger StrongArm models with higher weight capacities– the SA9000 and SA12000. Again, there’s only one difference between the two- SA9000s come with a 25 foot cable, while SA12000s have 50 feet and the pulley block and hook for double-line pulls or lifts.
The clutch lever available on all models of the Dutton-Lainson Company’s StrongArm electric winches allows for a controlled release of your load without using electric power, and makes it easy to pull line off the winch to attach to your load without having to power it out.
However, using a StrongArm winch with a clutch lever is only recommended in horizontal pulling applications. If you want to use a winch in a vertical lifing application, we recommend using one without a clutch lever installed on it.
It’s simply a matter of safety- if you lift something vertically with a StrongArm winch that has a clutch lever installed and someone bumps or accidentally flips the clutch lever into the freewheel position, your load will freefall to the ground, potentially damaging it or your winch, causing property damage, or injuring people.
To reduce the chances of an accident like this, only use a StrongArm winch with a clutch lever if you’re pulling something horizontally. If you’re lifting something vertically, use a winch without a clutch lever.
While this may seem alarming, it is actually normal. When running an electric winch in the power out direction, the brake mechanism gets very hot and burns off any oil film left from the assembly operation. As soon as the oil film is gone, the smoke will stop. As long as you observe the maximum run time for your winch, it is not a cause for concern.
The motors that are used in both StrongArm AC and DC winches are both DC motors. The motors for StrongArm 12V DC winches are 12V DC motors. The motors for StrongArm AC winches are 100V DC motors. A bridge rectifier is used to convert the incoming AC power to approximately 100V DC. If AC power gets connected directly to the 100V DC motor, it will burn up the motor.
It is easy to tell which motor is in a winch. The 12V DC motors are silver. The 100V DC motors (AC motors) are blue.
Both the AC and DC motors in StrongArm electric winches are fairly powerful motors that produce a lot of heat when ran. However, they are in small, enclosed cases, so there is no place for the heat to go. Because of this, they are designated as intermittent duty motors that are not designed to run continuously.
The motor should cool off seven minutes for each minute of run time, so let you winch cool off for seven minutes if you run it for one minute, 14 minutes if you run it for two minutes, and so on.
It is possible to modify your electric winch wiring harness to shorten or extend its length. This video covers both processes:
We offer an electric winch repair service at our manufacturing facility in Hastings, Nebraska. Visit this page for more information about it.
We first recommend checking out the troubleshooting guides section of our website, which is loaded with detailed explanations of how to fix potential electric winch problems. You may also find a solution in the product videos section of our website.
If those resources do not provide a solution to your winch’s issue, we are more than happy to assist you. Just give us a call at 1-800-569-6577 between 8 AM and 5 PM Central Time, Monday through Friday.
Please refer to the graphic below for help with determining your winch’s model number and when it was manufactured.
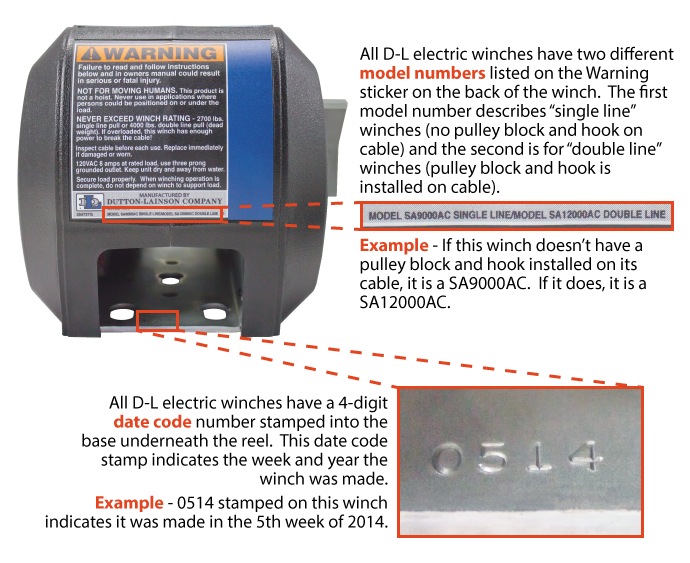
Please call us at 402-462-4141 if you have a Dayton-branded winch in need of repair or are wanting to buy parts to repair it yourself. Based on the model number and date code, we can help determine whether it was manufactured by Dutton-Lainson Company, and whether we might have the parts required for repair.
In our manufacturing facility, we use Lucas Oil Products’ blue marine grease (more info here: https://lucasoil.com/products/grease/marine-grease). You can use that same grease when lubricating your D-L product, but any good high pressure marine grease can also be used.
Yes, it is normal for the Lucas Oil Products marine grease we use to change from dark blue to black in color as the product is used over time.
Yes, you can replace the cable with strap on SA-series electric winches. Similar to replacing the cable on these models, your first step is to remove the cover from the winch (see the beginning of the “Replacing Cable on… StrongArm Winches” videos here: https://www.dutton-lainson.com/help-videos/step-by-step-videos/). Once the cover is removed, use the slots in the reel to install the strap (see the video on “Replacing Strap on TW9000 and TW9015 Electric Winches” video on the same page). Keep in mind that the strap must wind over the top of the reel on SA5000s and SA7000s, and under the reel on SA9000s and SA12000s.
If you own a SA5000 or SA7000 model, nothing else needs to be done- re-install the cover to your winch (see the end of the “Replacing Cable on… StrongArm Winches” videos) and it can then be used as normal. If you have a SA9000 or SA12000, you must first replace the front plate with part #404495 (which can be purchased here: https://www.dutton-lainson.com/proddetail.php?prod=TW9000-2), and then you can re-install your winch’s cover.
All StrongArm electric winches made by the Dutton-Lainson Company include a mechanical friction brake that will hold your load in place whether your winch is connected to power or not. This applies if the clutch (on models with a clutch) is in the engaged position and not in the freewheel position. Keep in mind, when winching operation has been completed, do not depend on the winch to support the load. Always secure the load properly. Use tie down straps or chains.
Also, all StrongArm models (except for the TW4000 and 4015) include an emergency crank handle that allows them to be operated if you don’t have power or if you lose access to it.
To use the handle, unplug your winch and use a flathead screwdriver to remove the plastic plug. On SA5000s and 7000s, this can be found on the side of the cover opposite from your winch’s clutch lever, power plug, or cord, and on the same side as all of that on SA9s, 12s, and the TW9000 and 9015.
Line up the flat side of the handle with the flat side of your winch’s drive shaft, completely engage the drive shaft with the handle, then you can crank it in either direction.
Depending on how much weight is attached to your winch, it may be very difficult to operate your winch with the emergency crank handle (especially on SA5 and 7000s), but if your winch has a clutch, you can make the cranking easier by putting the lever in the freewheel position. However, if you do this, be sure that you always keep a firm grip on the handle so it doesn’t spin out of control.
SA9 and 12000s with a clutch lever include an emergency crank handle that has a spring operated clip which will re-engage the clutch if you lose control of the handle. Keep in mind, though, that the handle will still violently spin one or two turns before it re-engages the clutch lever, so do not lose control of it.
If you have a TW4000 or 4015 without power, a 5/8″ socket wrench can be used to operate it, but on these models, you can only turn or ratchet the drive shaft in the counterclockwise direction to lift a load or pull it toward you. Also, you must keep the winch’s clutch knob in the engaged position when you operate it with a wrench.
Always remove the emergency crank handle or wrench after you use it and re-install the plastic plug.
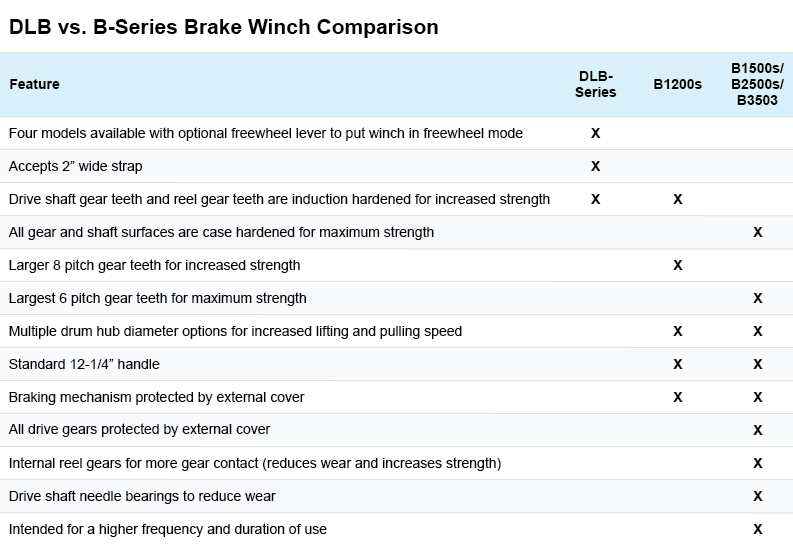
When comparing DLB and B-series winches made by the Dutton-Lainson Company, you’ll probably notice that they have a few things in common.
All models in both series have a bult-in automatic friction brake- as long as the winch’s minimum load requirement is met, when cranking stops, the load stops. Both feature laminated high carbon steel gears and embossed and reinforced bases, and both can be operated by a ratcheting handle or large boat lift wheel. They can even have the exact same weight capacity and share some other related specs.
So with all of these similarities, why do B-series winches cost more?
B1200 winches are a step up from DLB winches in that they have larger gear teeth for increased strength, multiple drumb hub diameter options for increased lifting and pulling speed, and braking mechanisms protected by an external cover.
However, B-series winches with a weight capacity of 1,500 lbs. or higher include all of these advanced B1200 features plus a unique set of their own, which allow them to be operated more often for longer periods of time.
These features include case hardened gear and shaft surfaces and even larger gear teeth for maximum strength, multiple drive shaft needle bearings to reduce wear, an external cover that also protects all drive gears, and internal reel gears to reduce wear and increase strength.
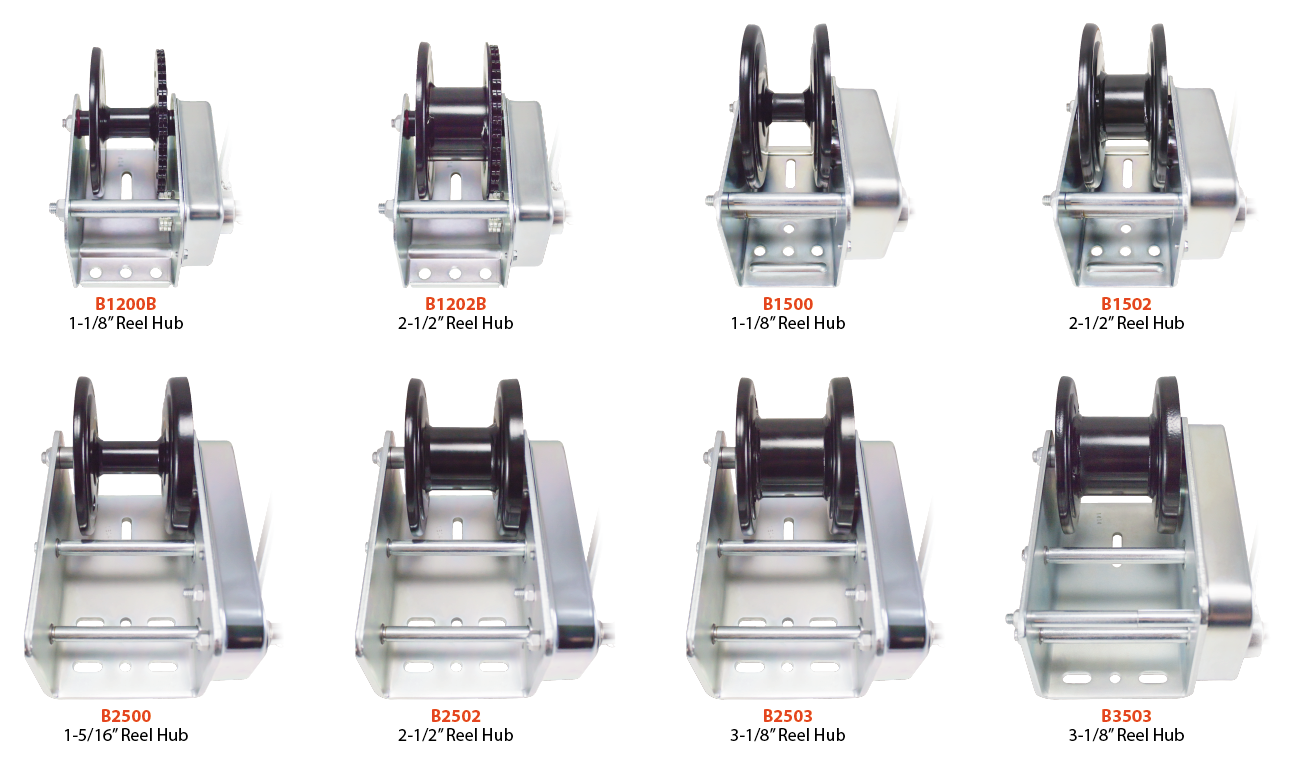
The only different between these B-series brake winch models is the diameter of the reel hub. An increased drum hub diameter reduces the amount of cable that fits on the winch but increases its lifting and pulling speed.
For example, the B1200B is exactly the same as the B1202B except for the diameter of its reel hub (1-1/8″ vs. 2-1/2″). The same applies to B1500s and B2500s.
Visit this page or refer to the graphic below for a comparison.
Once you have installed cable or strap on your Dutton-Lainson brake, pulling, or worm gear winch, your next consideration is which direction it should come off of your winch. Does it matter if it extends to your load back across the length of your winch, off the top of the reel perpendicular to the winch, or directly off the reel end of the winch?
The answer is yes, it absolutely matters!
Your installed cable or strap should always go directly off the reel end towards your load and never across the length of your winch.
Mounting your winch in this incorrect way could cause the cable or strap to rub against your winch’s base, drive shaft, or spacers while it is connected to a heavy load and being operated. Not only would this affect the operation of the winch, it will eventually wear out the cable or strap until it snaps or, even worse, wear out one or more of these vital metal parts until it breaks, which could result in catastrophic damage to your winch, your load, people around you, or you yourself.
You also should never mount your winch so its cable or strap goes straight off the top of the winch, as this increases the risk of damaging the winch base.
Because of these dangerous risks, you should always mount your winch so its installed cable or strap goes directly off the reel end of the winch away from any of its other parts, never back across the length of your winch or off the top of it.
One last thing- this answer and the video below is not answering another frequently asked question we receive about if cable or strap should come off the top of the winch’s reel or the bottom of it between the reel and the base. The answer to that question is also important, but varies by winch model, while the necessity to always mount your winch so its cable or strap goes directly off the reel end away from any other part on the winch does not.
So you’ve secured cable or strap to your Dutton-Lainson pulling, brake, electric, or worm gear winch and are ready to wind it onto the reel, but does it matter if the cable or strap comes over the top of the reel or under the bottom between the reel and the winch base?
It definitely matters, as winding cable or strap on your winch in the wrong orientation will cause its ratchet or braking system to not function properly and it will not hold your load.
The way you orient the cable or strap, however, does vary by the model of winch you have.
Cable or strap should come over the top of the reel on all worm gear winches, along with all D-L brake winches except for the DLB2500A and the B3503 where it should go under the bottom of the reel.
On StrongArm electric winches, orient your cable or strap to go over the top of the winch reel on SA5000s, 7000s, and the TW4000 and 4015. Your cable or strap should go under the bottom of the winch reel on SA9000s, 12000s, and the TW9000 and 9015.
Pulling winch models DLC600, DLC1100, and DL3500B should always have cable or strap coming over the top of their reel, while DLC1400s through DLC3200s and all DLx models are a special case. Almost everyone has cable or strap go over the top of the reel on these winches, but flipping the direction of the reversible ratchet lever allows for the cable or strap to be changed to going under the bottom of it between the reel and the base.
No matter what type or model of winch you have, be sure you correctly orient the cable or strap on its reel to ensure safe operation.
A commonly misunderstood feature of Dutton-Lainson brake winches is the built-in automatic friction brake.
This braking mechanism is reliant on a brake winch’s drive shaft threads and its handle hub threads engaging with one another. Turning the handle counterclockwise to lower a load does not forcibly turn the winch, it just “allows” the load on the winch to lower at the same speed the handle is turned.
So if you try to lower a load that weighs less than your brake winch’s minimum load, or if you try to crank empty cable or strap off of your winch so you can attach it to a load, one or both of the following issues will occur- your reel may continue to erratically turn without the load lowering, which results in a jumbled mess of cable on your reel instead of the tight, even layers you’re supposed to have. The winch handle may also unthread off of the drive shaft threads without the load lowering.
To fix either of these problems, thread the handle back onto the drive shaft attach a load heavier than your brake winch’s minimum load, and tighten up the jumbled cable on your reel, then you can use your winch as normal.
If your winch has more than the minimum load attached to it and your handle unthreads, there may be a problem with the winch that is not covered in the video below.
Generally, a 2-to-1 ratio is appropriate (1,100 lb winch for a 2,200 lb boat), but there are factors to consider. When a well-equipped and maintained roller trailer is used and the ramp setup is such that it allows the boat to float partway onto the trailer, the ratio can be stretched to 3-to-1. On the other hand, if the ramp is steep, a carpeted bunk trailer is used, or conditions require the winch to pull the boat a longer distance, the ratio should be reduced to 1-to-1.
More info on this topic cab be found on this page.
A self-locking winch should always be used in any situation that involves vertical lifting. DLB-series or B-series brake winches or a worm gear winch should be used to avoid the potential of a load free-wheeling out of control.
No. The “B” suffix at the end of a pulling winch model number means that the winch comes equipped with a hand brake that must be operated manually. It makes it easier to control the winch while releasing a load. It does not lock the load into place like a brake winch does.
Gear ratio is how many handle revolutions it takes to turn a winch’s spool once. A gear ratio of 4:1 means that it takes four complete turns of the handle to turn the spool 360 degrees.
Maximum mechanical advantage is a winch’s gear ratio times the mechanical advantage of the handle. The higher a winch’s maximum mechanical advantage, the less force you will have to apply to crank its handle.
Many of our winches are offered in two different finishes – zinc plated with TUFFPLATE or powder-coated with a matte black paint. The zinc finish costs a little more, and it tends to endure exposure to water better. Owners of boat trailers or lifts usually prefer the more neutral color of the silver. Powder-coated winches are widely used in non-marine applications. To some extent, it’s a matter of personal preference.
A two-speed winch refers to winches that have two drive shafts, to allow a choice between “low” and “high” gears. The lower gear would be used in steep or otherwise difficult situations, while the higher gear would result in faster operation. To change gears, the handle is removed and installed on the other drive shaft (no tools required).
Yes, a brake winch is a good choice for a boat trailer, as it adds an extra element of safety that many people like. Also, some models (DLB805A, DLB1205A, and DLB1505A) feature a freewheel lever for quickly pulling line from the winch, which speeds up the boat retrieval process. If you have a DLB800A, DLB1200A, or DLB1500A and would like to add a freewheel lever to it, refer to the second video below.
No, these types of high strength synthetic ropes are not recommended for D-L winches. These ropes are extremely slippery and pose a high risk of severely damaging the winch’s reel and ultimately the winch as a whole.
The term “two-way ratchet” is often misunderstood. All it means is that, prior to using the winch the first time, the user can choose which direction to wind the line onto the reel. Once that’s done, the extra ratchet position serves no purpose. Because of this, we developed and patented a reversible ratchet that is easier to use, but performs the same function. The ratchet pawl is installed with the assumption that cable will wind off the top of the reel (which is true in almost all cases), but it can be easily removed, turned around, and re-installed to allow cable to come off the bottom of the reel if needed.
A brake, worm gear, or electric winch is well suited for this application; however, once in position, the load must be secured by additional safety lines.
Yes, you can operate all DLB-series brake winches (except for the DLB1550A that is operated with the Quick-Attach handle) with a boat lift wheel that has a 5/8”-11 internal thread in the center hub, and you can operate all B-series brake winches (except the B4010A ceiling winch) and all CD-series brake winches with a boat lift wheel that has a 7/8”-9 internal thread in the center hub.
Be sure that you use the handle spring and nut that is included with all DLB-series winches to secure the wheel to your DLB-series winch; the handle bolt, spacer, washer, and spring that is included with all B-series winches to secure the wheel to your B-series brake winch; and the screw and washer that is included with all CD-series winches to secure the wheel to your CD-series brake winch.
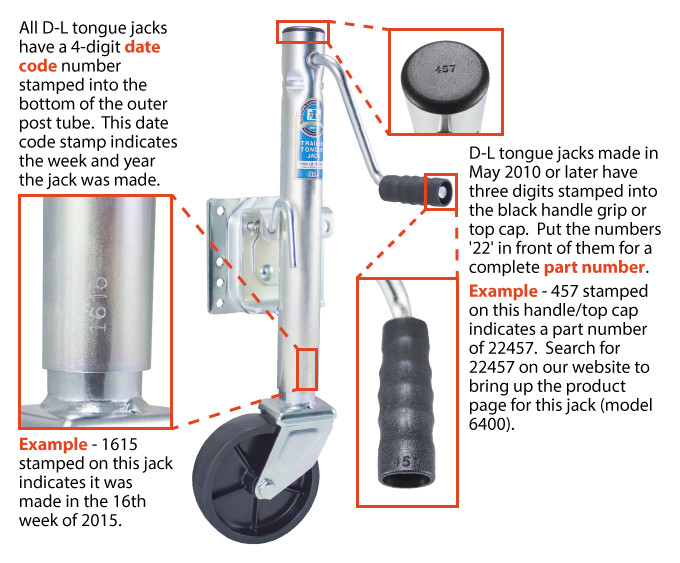
The most common cause is when the jack handle is squeezed between the trailer tongue and the bumper of the towing vehicle. Other symptoms of this condition would be a damaged handle bushing and or a missing top cap in addition to the broken handle. It is important to realize that the trailer jack will reduce how tightly one can turn, and care must be taken not to pinch the jack between the tongue and bumper. Sometimes re-positioning the jack is helpful in preventing this kind of damage.
No, this “20” number printed on your jack’s label is the part number for that label and is not the part number for the jack itself. For help with figuring out your jack’s part number, please see the graphic displayed in the FAQ answer listed below.
Please refer to the graphic below for help with determining your tongue jack’s model number and when it was manufactured. For help with figuring out the part number of your jack if it was manufactured before May 2010, please call us at 1-800-569-6577 between 8 AM and 5 PM Central Time, Monday through Friday.